

Saturday, December 31, 2011
Pig Update: Leafing
Friday, December 30, 2011
Pig Update: Shades of (Benicia) Blue
I was pretty disappointed with the way my glaze turned out. I only blame the one holding the brush on that (aka "me"). Ah well, lesson learned.
Pig is no longer so innocent and unassuming. He's developed an interesting personality lately. I finished the sculpt this morning, then tonight did a little sanding and applied the paint. I used Magic Sculp for the addition of the eyebrows, lips, tongue, and to hold the wing wires in place. Awesome product!
For those of you that wonder what paint will stick to glazed ceramics, I highly recommend you give Krylon Fusion for Plastics a try. That stuff is AMAZING! You still have to be careful before it cures, and I wouldn't go knocking it about if it can be avoided, but it's held up well on the test skulls I sprayed a couple months ago.
So the pig has his base coat of paint, and he is a lovely shade of Benicia Blue, or at least a reasonably close version. Ever since I did the concept sketch for the pig, I wanted to paint him Benicia Blue.
 Eyebrows added to disguise the little eyes close together. I'm painting new eyes in. I was messing around with the magic sculp the other night and decided I wanted to give him a tongue, so the lips had to go with it. A tribute to Mick Jagger and Gene Simmons! Gave him cloven hooves too.
 Wing armature. The wings will be constructed out of copper wire.
 The other side.
 Top/back. You can kind of see the outline from the glaze. To disguise that will either involve clever pinstriping, or some leafing AND clever pinstriping. May go with copper leafing just to tie in with the copper wings.
My deadline? I have to have this back to Artcentric by January 3! Eep!! Ah well, I do most of my projects like this under pressure, so cue the Mission Impossible music!!
Pig is no longer so innocent and unassuming. He's developed an interesting personality lately. I finished the sculpt this morning, then tonight did a little sanding and applied the paint. I used Magic Sculp for the addition of the eyebrows, lips, tongue, and to hold the wing wires in place. Awesome product!
For those of you that wonder what paint will stick to glazed ceramics, I highly recommend you give Krylon Fusion for Plastics a try. That stuff is AMAZING! You still have to be careful before it cures, and I wouldn't go knocking it about if it can be avoided, but it's held up well on the test skulls I sprayed a couple months ago.
So the pig has his base coat of paint, and he is a lovely shade of Benicia Blue, or at least a reasonably close version. Ever since I did the concept sketch for the pig, I wanted to paint him Benicia Blue.


My deadline? I have to have this back to Artcentric by January 3! Eep!! Ah well, I do most of my projects like this under pressure, so cue the Mission Impossible music!!
Thursday, December 29, 2011
Pig Update
Time is ticking away! I have completed the sculpt on the pig for the Parade of Pigs. Now the painting and wing building can commence.
Yes, the Dragon Pig's mouth is a tribute to Mick AND Gene, why do you ask?
Yes, the Dragon Pig's mouth is a tribute to Mick AND Gene, why do you ask?
Wednesday, November 2, 2011
Painting a (Ceramic) Pig for a Cause
I started painting my pig tonight. Early in October, I wrote about the Parade of Pigs put on by the Benicia Education Foundation and
Artcentric. Decided to throw my lot in with the
local artisans and students painting up piggy banks for a cause. I know
there were many who applied, so I am happy my design one of the 20
selected.
The pig is a ceramic piggy bank that, when finished, will join the rest of them to be distributed to local shops on First Street in downtown Benicia to act as a way to collect donations for the schools in Benicia. That will happen in early January. The pigs will be in their host locations until May, when they return to Artcentric to be auctioned off. Again, the funds go to the cause.
So now I need to find a host store on First Street. One that has a lot more foot traffic than my humble place of work. Or maybe more than one place to split the time?
Tonight I started applying some glaze to the ceramic, but I'm not doing JUST glaze. I have other ideas, involving spray paint, 1-shot (anybody surprised?), leafing, some sculpted wire, and other things. I will be posting progress pics along the way.
Here are some of the beginning shots:

Blank canvas.

Looks so innocent, so unassuming. So ready to become…
DRAGON PIG!!

To the left, a very rough sketch of the idea. Beginning to rough in the face sketch for future reference, and beginning the glazing process.

Continuing the glazing process. Figured to keep durability in mind, I'm glazing the area surrounding the hole on the top. The rest will be in my preferred spray paints and 1-Shot.
UPDATE: 11/30/11
Due to election coverage and my editor being on paternity leave for 3 weeks, I wasn't able to work on the pig until tonight. The final coats of glaze are applied (the design is still the same) and it is awaiting a firing. Once fired, the blue areas will be nice and shiny. The rest of it will then be subjected to my crazy ideas. Stay tuned!!
Tuesday, July 5, 2011
An Armor Ring in Copper
I love armor rings. The articulation, the hint of it being a part of weaponry, the “Heavy Metal” aspect to them… so when Julie Mauerer posted this tutorial for an armor ring, I HAD to do it! A great challenge in metalsmithing, soldering, and cold connections (riveting). I am excited for the semester to start back up so I can make a few more of these with different decoration.
 Thankfully my fingernails did not have the “pinstriper’s manicure” when I took this photo. The ring fits comfortably, but it is a little too heavy to wear for painting. It throws my hand’s balance off.


I wanted the ring to have a distressed and battered look to it, achieved by scuffing with a series of files (I attacked it!) and antiquing. The burnished look resulted from tumbling with steel shot.


I wanted the ring to have a distressed and battered look to it, achieved by scuffing with a series of files (I attacked it!) and antiquing. The burnished look resulted from tumbling with steel shot.


Friday, April 22, 2011
Been on a Brief Hiatus

I have been caught up in a lot of other things lately, and sadly I have neglected my blog!
To make up for it, let me share one of my “in progress” pieces… another 3 wire woven cuff much like the 3 Wire, Unleashed I created last year. Same base, but I've gone in a wildly different direction with it! One thing I have kept very similar to the last cuff was the treatment on the clasp. That will be the same.
Like the twisty crazy wire? I’ve been obsessed with the sculptural wire jewelry for a few years, and I am determined to learn how to do it! Unfortunately, other than Remy Heath’s wonderful Woven Sculpture Pendant tutorial, and a few other very basic “rainbow weave” tutorials, there is very little in the way of documentation on how to do this. So, I am muddling through on my own just like everybody else that wants to learn this technique! It is a lot of fun, like a deranged jigsaw puzzle.
This piece has been in progress for about a year now. I pick it up, work on it until I get lost, then put it down again for a period of time. I haven’t decided whether I am near a stopping point or not. But it has been a lot of fun to let the mystery unfold!
Thursday, February 17, 2011
Year Of Jewelry Challenge: Week 6
The theme for the Year of Jewelry Challenge, Week 6 was “Amoré”.
This piece was commissioned by a fellow pinstriper/artist from Ireland. He really like the Tree of Life pendants I had been posting, and wanted one for his wife. And he said his wife really liked jade. Since the only jade I had on hand & in order to get this done in time, I chose to go with a frame style to an older tree of life:
 Like this, but I changed it to where the bail was a part of the frame, rather than a loose ring.
This is the result:
 I also went with the tree style I had learned from my working with Ellen Thurmond of Ethora last year. I really love her style of tree. Changed it up a little, but I still give her credit for the tree design itself.
This piece was commissioned by a fellow pinstriper/artist from Ireland. He really like the Tree of Life pendants I had been posting, and wanted one for his wife. And he said his wife really liked jade. Since the only jade I had on hand & in order to get this done in time, I chose to go with a frame style to an older tree of life:

This is the result:

Year Of Jewelry Challenge: Week 5
The theme for the Year of Jewelry Challenge, Week 5 was “Down & Dirty”. This tied in perfectly with the chasing & repoussé I had been learning thanks to the guest instructor in my jewelry class. Since the method we were learning involved putting the metal in a bowl of pitch, and the methods used to extract the metal from the pitch and the involved cleanup were all very messy, I figured it couldn’t get much messier than that.
Session 1 consisted of a bit of repoussé:


Session 2 was a bit more repoussé, then flipping it over for some chasing:


Session 3 was the final class, and I had a couple more passes with the chasing before I had to remove it from the pitch and clean it up:


For the final session I brought in my plastic human skull model to give me a better idea of the depth and planes while I was hammering. Made things a bit easier to think out.
I have to say, I LOVE this technique, and can’t wait to have the opportunity to play with it again.
Year Of Jewelry Challenge: Week 4
Week 4 of the Year of Jewelry Challenge was “Wild & Wicked”. As it has been “Wild & Crazy” in my life with the crazy book project I have been working on, this piece was in progress at the Week 4 deadline, and still is. I finally have a bit of breathing room to post it.
I'm on a “dual purpose pendant” kick of late, so this is yet another version. Another thing that I am obsessed with would be skulls.
 Copper background, rich low brass skull (which looks a lot more like gold, and a lot less of the green ‘brassiness’ of regular brass) and nickel silver. Still need to etch the details into the skull, and do some texturing on the copper before riveting it all together.
 The sketch behind the piece. ©2011 Phoenyx Arts, of course. :)
I'm on a “dual purpose pendant” kick of late, so this is yet another version. Another thing that I am obsessed with would be skulls.


Monday, January 24, 2011
A Few More "Dual Purpose" Pendants
Around the time I completed my Week 3 “Year of Jewelry Challenge” submission, I had also completed these pieces.
First up is a twisted and swirled piece with garnet accents.
 This piece was a lot of fun to twist together, because it challenged me to manipulate thicker wire into looking sinuous. Some hammering on the bail and the bottom of the loop give it a little bit of a textured accent.
 There is enough room to hang thicker sunglasses frames from these as well as the more delicate wire framed reading glasses.
No added gemstones on this dual spiral, it is all copper wire.
 This piece was constructed very similarly to my Hammered Hearts pieces. Thick wire, twisted & hammered, then woven together for support and embellisment.
 Again, ample size on the bottom loop for various sizes of glasses & sunglasses.
Last but not least we have a smaller piece which is accented with some lovely peridot chips:
 The gemstones and smaller wire add extra texture to this swirled & hammered design.

Smaller, yes, but you can still have the versatility of different sized glasses frames.
First up is a twisted and swirled piece with garnet accents.


No added gemstones on this dual spiral, it is all copper wire.


Last but not least we have a smaller piece which is accented with some lovely peridot chips:


Smaller, yes, but you can still have the versatility of different sized glasses frames.
Saturday, January 22, 2011
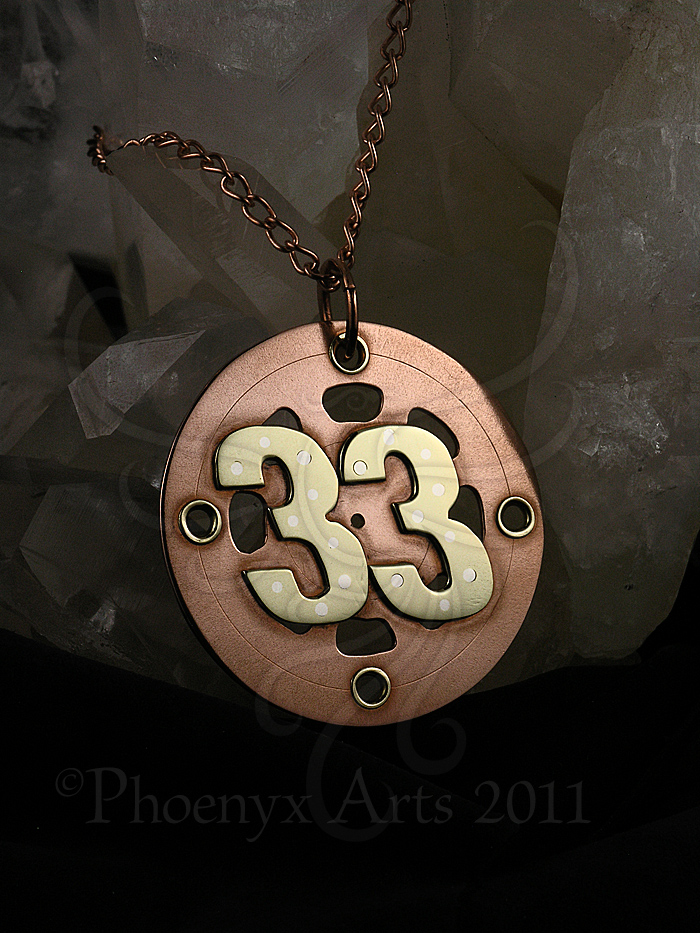
A new, improved "unabashed" 33 pendant!
To quote one of my least favorite pop tarts... …“oops, I did it again!”
Another “unabashed” #33 Clint Bowyer pendant. Copper, brass and sterling rivets. All cold connection. Made the numbers a little neater, different texture and treatment to the copper. I left it all unantiqued to let it develop a patina on its own. Of course the wearer could keep it looking as fresh as a newly minted penny by giving it a periodic cleansing in ketchup to keep the tarnish off. :)

Slightly different treatment on the copper. The numbers were derived from an actual typeface rather than a rough sketch like my original “unabashed” pendant. Still it conveys the spirit of the piece, and the wearer would get a lot of attention from it.


This is the backside view of the piece showing how the rivets look. They shine up kinda pretty, like a constellation. Its the Clint Bowyer constellation, baby! Oh yeah! Rising star!!
Another “unabashed” #33 Clint Bowyer pendant. Copper, brass and sterling rivets. All cold connection. Made the numbers a little neater, different texture and treatment to the copper. I left it all unantiqued to let it develop a patina on its own. Of course the wearer could keep it looking as fresh as a newly minted penny by giving it a periodic cleansing in ketchup to keep the tarnish off. :)
Slightly different treatment on the copper. The numbers were derived from an actual typeface rather than a rough sketch like my original “unabashed” pendant. Still it conveys the spirit of the piece, and the wearer would get a lot of attention from it.


This is the backside view of the piece showing how the rivets look. They shine up kinda pretty, like a constellation. Its the Clint Bowyer constellation, baby! Oh yeah! Rising star!!
Year Of Jewelry Challenge: Week 3
This is a Dual Purpose piece. First of all, its a lovely hammered copper pendant, with woven embellishments, and hematite beads.
 But wait, there’s more!
It is also an…
EYEGLASS HOLDER PENDANT!!

While this is not an original idea, the design and execution are my own. This stands well on its own as a pendant, but makes a great place to hang your eyeglasses or even sunglasses without having to use the ones that suspend from your ear pieces. While those are great, I personally find them cumbersome.
I like to use one for my sunglasses when I am out at car shows or outdoor events, and I am photographing cars, people, etc. Great place to keep my shades safe since I'm usually wearing a cowboy hat & can’t perch them on my head.
I have a number of these I just completed, and they will be up for sale on my ArtFire page very soon. Phoenyx Arts Artfire Page

Year Of Jewelry Challenge: Week 2
Ok, a little late on posting the Week 2 entry, but that's only because I didn't get it done until well after the Week 2 deadline. The suggested theme for Week 2 was “lunar eclipse” but I will call this one “oh for Peace sakes, my need to get other deadlines finishes completely eclipsed my ability in meeting the week 2 YOJ dealine on time”. I am working on a baseball related book as a contract job, and its “eclipsing” just about everything else right now.
However, enough whining about that. Here is the peace, er, piece:

I got the idea for the execution of this from Tangocat Gems’ “Filigree Cross” tutorial. Thought it would be fun to do a peace symbol using the same twisting & twining that she illustrated in that tutorial. Copper wire.
However, enough whining about that. Here is the peace, er, piece:

I got the idea for the execution of this from Tangocat Gems’ “Filigree Cross” tutorial. Thought it would be fun to do a peace symbol using the same twisting & twining that she illustrated in that tutorial. Copper wire.
Friday, January 21, 2011
GREAT Pinstriping Video!
This is a fantastic example of why I love this art form so much. Kind of hypnotic to watch these guys doing their magic. Enjoy!
Sunday, January 9, 2011
Year Of Jewelry Challenge: Week 1
About a year or so ago I started running across blog postings by various jewelry artists I really respect, and noticed they would post "Year of Jewelry" entries. Last month I was lucky enough to find out from Nancy Wickman of Wickwire Jewelry that there was another one starting up for 2011!
The Year of Jewelry Challenge is to create and post a new piece of jewelry every week. My personal challenge is to stick with this and to learn a lot more about the creation of jewelry and its various techniques.
 The theme for Week 1 is “New Beginnings”, and decided what I've been playing with in the lessons from Jodi Bombardier's new book "Weave, Wrap, Coil" would be appropriate. The ring is the first woven wire ring I have ever made (and the jury is still out to whether I enjoyed it or not) and the other piece is part of one of the necklace projects. While I'm pleased with the weaving on this piece (and it was a challenge to weave to a narrower point!) the symmetry is off on the frame. So, this will likely become the dangle on a forged copper bookmark or something.
The Year of Jewelry Challenge is to create and post a new piece of jewelry every week. My personal challenge is to stick with this and to learn a lot more about the creation of jewelry and its various techniques.

Couple New-ish pieces
Another fun use for the Skull design I created some time back… earrings!
 This time I cut the skulls out of copper, and riveted them to brass using sterling wire. Details were added to the skulls using the Dremel engraver. I polished the entire thing to a high shine, then decided to dip them into liver of sulfur to give them that antiqued look.
My friend and occasional coworker commissioned me to make this necklace for his mom for Christmas. Since she is a big fan of the Grateful Dead we decided a Peace symbol would be appropriate. After some trial and error, then going off in a direction that I needed to steer my way back out of, this is the result:
 Woven peace symbol on a hammered frame. Copper wire, with amethyst, laboradorite, carnelian, sunstone & moonstone. All the stones tie in astrologically with the members of the family. Ended up making the chain too, because pairing this piece with a commercially made chain looked, well, wrong. Wasn't originally part of what I was going to make, but it was a matter of pride, and since both my friend and his mom are both really good people, worth the extra effort.
Multiple shots, because I'm experimenting with different ways of photographing my jewelry to see what showcases it the best for the pieces that will be posted on ArtFire soon.

 Makes me glad I've held on to these crystals over the years.

 Plain white background is ok, but I'm still at a loss on photographing a piece without any "props". Ah well, its all a learning process.

My friend and occasional coworker commissioned me to make this necklace for his mom for Christmas. Since she is a big fan of the Grateful Dead we decided a Peace symbol would be appropriate. After some trial and error, then going off in a direction that I needed to steer my way back out of, this is the result:

Multiple shots, because I'm experimenting with different ways of photographing my jewelry to see what showcases it the best for the pieces that will be posted on ArtFire soon.


Subscribe to:
Comments (Atom)